
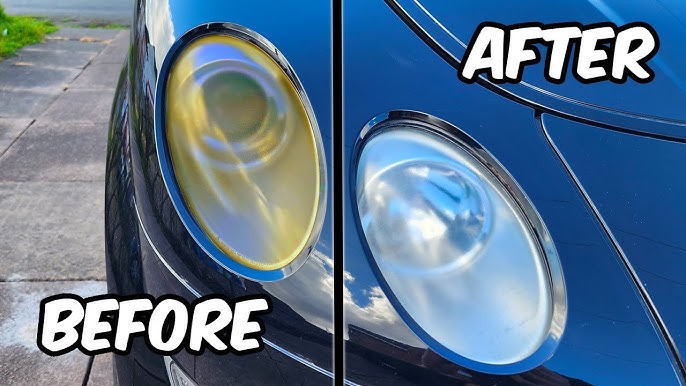
Are your car headlights looking dull or foggy? This can make driving at night dangerous and even lower your car’s value.
But don’t worry—you don’t need to spend a lot of money or visit a mechanic to fix them. You’ll learn simple and effective ways to polish your car headlights yourself. By the end, your headlights will shine bright again, improving your safety and your car’s appearance.
Ready to see the difference clear headlights can make? Let’s get started!
Tools And Materials Needed
Polishing car headlights requires certain tools and materials to achieve clear, bright results. Using the right supplies makes the job easier and more effective. Gather everything before starting to avoid interruptions.
Some items are necessary for any headlight polishing task. Others can help improve the outcome or speed up the process. Knowing the difference helps prepare better.
Essential Supplies
- Car headlight cleaner or polishing compound
- Sandpaper (various grits, usually 600, 1000, and 2000)
- Microfiber cloths
- Masking tape
- Spray bottle with water
- Protective gloves
Optional Extras For Better Results
- Electric drill with polishing pad attachment
- UV sealant or clear coat spray
- Plastic primer
- Fine polishing compound
- Detailing tape for precise edges
Credit: carcapsule.com
Preparing The Headlights
Preparing the headlights is the first important task before polishing. It helps to get rid of dirt and dust. This step also protects your car’s paint from accidental damage. Clean and secure surroundings make the polishing process easier and safer. Proper preparation ensures better polishing results and a clearer headlight.
Cleaning The Surface
Start by washing the headlights with soap and water. Use a soft cloth or sponge to remove dirt. Avoid harsh scrubbing that can scratch the plastic. Rinse the headlights thoroughly to remove all soap. Dry the surface with a clean microfiber towel. This removes moisture and prepares the area for polishing.
Protecting Surrounding Areas
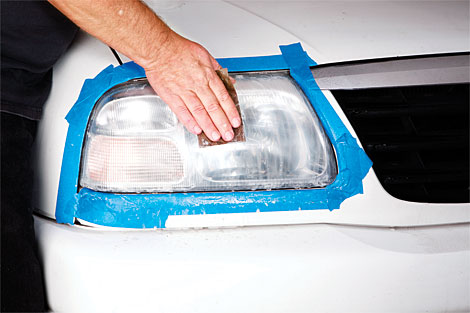
Use painter’s tape around the headlights to protect the paint. Cover the edges and nearby parts carefully. This prevents polish or sanding materials from touching the paint. Use plastic sheets or paper to cover larger areas. Secure the coverings firmly to avoid slipping during work. Protecting the car ensures a clean and safe polishing process.
Sanding The Headlights
Sanding the headlights removes the cloudy layer that dulls the light. Use fine sandpaper to smooth the surface gently. This step helps restore clear and bright headlights.
Sanding the headlights is a crucial step in restoring their clarity. It removes the oxidized layer on the surface. This step ensures your headlights look clear and new again. Proper sanding can make a big difference in the final result.
Choosing The Right Sandpaper
Select the correct sandpaper for your headlights. Start with a coarse grit, like 800. This grit helps remove the top layer effectively. After that, use finer grits, like 1000 or 2000. They smooth out the surface and prepare it for polishing. Ensure the sandpaper is waterproof for wet sanding.
Wet Sanding Technique
Wet sanding is gentle and reduces dust. First, soak the sandpaper in water for 10 minutes. Use a spray bottle to keep the headlight surface wet. Sand in a back-and-forth motion, applying even pressure. Move horizontally, then vertically for an even finish. Check your progress frequently to avoid over-sanding. Rinse the headlight often to see your work clearly.

Credit: www.youtube.com
Applying Polish
Applying polish to your car headlights is a crucial step to restore their clarity and improve your vehicle’s appearance. It requires patience and the right approach to achieve a smooth, clear finish. Knowing how to select the right polish and the best buffing techniques can make all the difference in your results.
Selecting The Best Polish
Not all polishes are created equal. Some are designed specifically for plastic headlights, while others work better on glass. Look for a polish that contains mild abrasives to gently remove oxidation without scratching.
Consider polishes with UV protection to help prevent future yellowing. I once tried a general-purpose polish and ended up with a foggy finish, so choosing a product made for headlights is worth the investment. Have you checked the label to ensure it’s safe for your headlight material?
Buffing Methods
Buffing can be done by hand or with a power tool. Hand buffing offers more control and is less likely to cause damage but requires more effort. Using a soft microfiber cloth, apply the polish in small circular motions, maintaining even pressure.
If you prefer faster results, a dual-action polisher is a great choice. It reduces the risk of overheating the plastic and helps spread the polish evenly. Remember, too much pressure or speed can cause scratches, so start slow and test on a small area first.
- Apply a small amount of polish to the cloth or pad.
- Buff in overlapping circles to cover the entire headlight surface.
- Wipe away excess polish with a clean microfiber towel.
What kind of buffing method do you think suits your comfort level? Trying both might reveal which technique works best for you.
Sealing For Protection
After polishing your car headlights, sealing them is a crucial step to keep them clear and bright for longer. Without a protective layer, your hard work can quickly wear off due to exposure to sunlight, dirt, and moisture. Sealing not only preserves the shine but also prevents future yellowing and cloudiness.
Importance Of A Protective Coat
A protective coat acts as a barrier against UV rays, which are the main cause of headlight fading. It also shields the surface from road grime, water, and chemicals that can cause damage over time.
Applying a sealant extends the life of your polished headlights. Have you noticed how quickly your headlights get dull after polishing without sealing? That’s because the protective layer is missing.
Sealing saves you time and money by reducing how often you need to restore your headlights. Plus, it keeps your car looking newer and safer at night.
Types Of Sealants
You have several options for sealing your headlights. Here are the most common types:
- UV-resistant clear coat:This spray or liquid forms a strong, transparent layer that blocks harmful ultraviolet rays.
- Car wax or polymer sealants:These provide a decent level of protection and are easy to apply but usually last shorter.
- Headlight-specific sealants:Designed especially for headlights, these products offer excellent durability and protection.
Choosing the right sealant depends on how often you want to maintain your headlights and the conditions you drive in. Have you tried different sealants before? Which one gave you the best results?

Credit: www.youtube.com
Maintaining Clear Headlights
Keeping your headlights clear is essential for safe driving and maintaining your car’s appearance. Over time, headlights get cloudy or yellowed due to dirt, UV rays, and road debris. Regular care can prevent this damage and keep your lights shining bright.
Regular Cleaning Tips
Clean your headlights every two weeks to stop grime buildup. Use a soft cloth with mild soap and water—avoid harsh chemicals that can damage the plastic lens.
Try wiping with a microfiber cloth after washing. It picks up fine dust without scratching. Also, consider rinsing with clean water to remove any soap residue.
Don’t forget to dry the headlights thoroughly. Moisture left on the surface can cause spots and reduce clarity over time.
Preventing Future Damage
Protect your headlights by applying a UV-resistant sealant after cleaning. This simple step slows down yellowing caused by sun exposure.
Park your car in shaded areas or use a car cover to shield headlights from harsh sunlight and weather. Have you noticed how much better your headlights look when you avoid direct sun?
Inspect your headlights regularly for cracks or chips. Fixing small damage quickly prevents dirt and moisture from seeping in and causing bigger issues.
Frequently Asked Questions
How Often Should I Polish My Car Headlights?
Polish your car headlights every 6 to 12 months. Regular polishing maintains clarity and improves nighttime visibility. Frequent care prevents yellowing and damage from UV rays. It keeps your headlights looking new and enhances overall safety.
What Materials Do I Need To Polish Headlights?
You need sandpaper, polishing compound, microfiber cloths, and masking tape. Optional items include a drill with polishing pads and UV sealant. These materials help remove oxidation, smooth surfaces, and restore clarity effectively.
Can I Polish Headlights Myself Or Need A Professional?
You can polish headlights yourself with basic tools and patience. DIY polishing saves money and is straightforward with proper instructions. However, severe damage may require professional restoration for best results.
How Long Does Polishing Car Headlights Take?
Polishing car headlights typically takes 30 to 60 minutes per headlight. Time depends on the damage severity and method used. Proper preparation and careful polishing ensure a clear, bright finish.
Conclusion
Polishing car headlights improves visibility and safety. Clear headlights help you see better at night. It also makes your car look newer and cleaner. You only need a few simple tools and some time. Regular cleaning stops yellowing and cloudiness from building up.
Try polishing your headlights every few months for best results. Your car will shine bright and keep you safe on the road. Give your headlights some care and enjoy clearer, safer drives.