
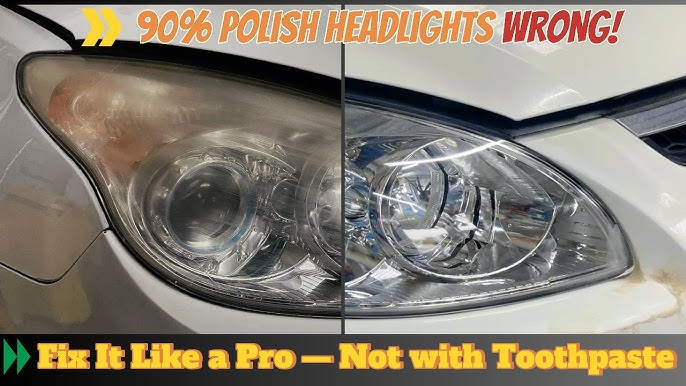
Are your car headlights looking dull or cloudy? This can make driving at night harder and even unsafe.
Luckily, you don’t need expensive tools or professional help to fix them. You can brighten your headlights using something you probably already have at home—toothpaste. In this guide, you’ll learn a simple, effective way to polish your car headlights and improve your night driving.
Keep reading, and you’ll be surprised how easy it is to make your headlights shine like new again.

Credit: www.carsales.com.au
Why Headlights Get Cloudy
Have you noticed your headlights looking dull or hazy over time? Cloudy headlights are a common problem that affects many vehicles, reducing the brightness of your lights and making night driving less safe. Understanding why headlights get cloudy can help you take better care of them and know exactly how to restore their clarity using simple household items like toothpaste.
Effects Of Uv Exposure
Ultraviolet (UV) rays from the sun are one of the main reasons headlights become cloudy. The plastic lens of your headlights is coated with a protective layer that breaks down when exposed to UV light for long periods.
This breakdown causes the surface to degrade and turn yellow or hazy. Have you ever left your car parked outside all day? That constant sun exposure speeds up the clouding process.
Impact Of Dirt And Grime
Dirt, road salt, and grime constantly hit your headlights as you drive. Over time, these particles build up and form a layer that dulls the lens.
Even washing your car may not remove all the microscopic dirt stuck in tiny scratches or cracks on the surface. This grime layer reduces how much light passes through, making your headlights less effective.
Signs Of Oxidation
Oxidation happens when the plastic reacts with oxygen in the air, causing the surface to become rough and cloudy. You might notice a chalky, white film forming on your headlights.
Oxidation worsens if you live in humid or rainy areas because moisture speeds up the chemical reaction. If you see this chalky layer, it’s a clear sign your headlights need polishing.
Choosing The Right Toothpaste
Choosing the right toothpaste is key to polishing car headlights effectively. Not all toothpastes work well for this task. The right type can remove yellowing and haze without damaging the plastic lens. It also helps restore clarity for safer night driving.
Understanding the types of toothpaste can guide your choice. Look for toothpaste with mild abrasives that clean without scratching. The texture and ingredients make a big difference in results.
Types Of Toothpaste To Use
- Whitening toothpaste: Contains gentle abrasives that help remove stains.
- Non-gel toothpaste: Usually thicker and more abrasive than gels, better for polishing.
- Paste with baking soda: Slightly gritty, effective for light polishing tasks.
- Plain toothpaste without added dyes or flavors: Reduces risk of residue.
Avoiding Gel-based Options
Gel toothpastes often lack the abrasives needed to polish headlights. Their smooth texture cleans teeth but does little for plastic lenses. Using gel toothpaste may waste time and effort.
Gels also leave behind sticky residues harder to remove. This can attract dirt and worsen headlight clarity. Choosing a paste over gel ensures better polishing action and easier cleanup.
Preparing Your Car For Polishing
Before you start polishing your car headlights with toothpaste, it’s important to prepare the area properly. Taking a few simple steps will make your polishing more effective and protect your car’s finish. Cleaning the headlights and gathering the right supplies set the foundation for a smooth, successful process.
Cleaning The Headlights
Start by washing the headlights with soap and water to remove dirt, dust, and grime. Use a soft cloth or sponge to avoid scratching the surface. This step ensures the toothpaste can work directly on the cloudy layer rather than pushing dirt around.
After washing, dry the headlights thoroughly with a clean towel. Moisture can dilute the toothpaste and reduce its effectiveness. Have you noticed how quickly dirt builds up on headlights? Cleaning them well lets you see the real condition before polishing.
Gathering Necessary Supplies
To polish your headlights with toothpaste, gather a few simple items. You will need:
- White, non-gel toothpaste (preferably with baking soda)
- A soft cloth or microfiber towel
- A spray bottle of water or a damp cloth
- Masking tape to protect the paint around the headlights
Having everything ready before you begin saves time and keeps you focused. Did you know regular toothpaste contains mild abrasives perfect for polishing? Using the right type makes a big difference in the final shine.
Step-by-step Polishing Process
Polishing car headlights can improve visibility and appearance. Using toothpaste is a simple and cost-effective solution. Follow these steps to restore clarity to your headlights.
Applying Toothpaste
Choose a non-gel toothpaste for effective results. Squeeze a generous amount onto a soft cloth. Spread evenly over the headlight surface. Ensure complete coverage for best results.
Scrubbing Techniques
Use circular motions to scrub the headlight. Apply gentle pressure while scrubbing. Focus on areas with heavy oxidation. Scrub for five minutes for thorough cleaning.
Rinsing And Drying
Rinse the headlight with clean water. Remove all toothpaste residue. Use a microfiber cloth to dry the surface. Ensure no streaks remain after drying.
Tips For Best Results
Getting the best results when polishing your car headlights with toothpaste means paying attention to a few simple but crucial details. These tips help you avoid common mistakes and achieve a clear, bright finish that lasts longer. Small changes in your technique can make a big difference in how your headlights look and perform.
Using A Soft Cloth
Always choose a soft cloth to apply and buff the toothpaste. Microfiber cloths work best because they won’t scratch the surface. Using rough materials can damage your headlights, undoing all your hard work.
Think about the last time you cleaned your glasses with a scratchy tissue—did it help or hurt? The same idea applies here. A gentle touch with the right cloth protects the plastic while polishing it.
Applying Even Pressure
Keep your pressure steady and even as you rub the toothpaste on the headlight. Pressing too hard might cause uneven spots or scratches, while too little pressure won’t remove the haze effectively.
Imagine sanding a wooden table: too much force creates gouges, too little leaves it rough. Find a balanced pressure that feels firm but controlled for smooth, consistent results.
Repeating The Process
Don’t expect instant perfection after just one round. Sometimes, you need to repeat the polishing process two or three times to fully clear up stubborn oxidation.
Take a moment to check your progress between attempts. If your headlights still look cloudy, another gentle round of polishing can make the difference. Have you noticed how many layers it takes to get your headlights truly clear?

Credit: www.youtube.com
Maintaining Headlight Clarity
Maintaining headlight clarity keeps your car safe and looking good. Clear headlights improve night vision and help other drivers see you. Over time, headlights gather dirt, grime, and oxidation that dull their surface. Regular care can stop this damage and extend the life of your headlights.
Regular Cleaning Routine
Clean headlights often to prevent buildup. Use mild soap and water to wash off dirt. Dry with a soft cloth to avoid scratches. Check headlights for cloudiness or yellowing every few weeks. A quick polish with toothpaste can restore shine and remove minor stains. Keep cleaning simple and consistent for best results.
Protective Coating Options
Apply a protective coating after cleaning to guard headlights. These coatings block UV rays and slow oxidation. Choose from clear sprays, waxes, or sealants made for headlights. Follow product instructions carefully for strong protection. Reapply coatings every few months to maintain clarity. This step helps headlights stay clear longer and reduces frequent polishing.
When To Seek Professional Help
Polishing car headlights with toothpaste works well for minor cloudiness and surface scratches. Some problems need expert attention to avoid further damage or poor results. Knowing when to seek professional help ensures your headlights stay clear and safe on the road.
Severe Damage Signs
- Headlights have deep cracks or chips
- Lens surface feels rough or pitted
- Yellowing is thick and does not improve
- Light output is noticeably weak or uneven
- Scratches are too deep for toothpaste to fix
- Moisture or fog inside the headlight lens
These signs show damage beyond simple polishing. Toothpaste can only fix light surface haze, not structural issues.
Benefits Of Professional Polishing
- Experts use special tools and compounds
- Headlights get restored to near-new clarity
- Long-lasting protection with sealing coatings
- Improves overall safety by boosting brightness
- Prevents further damage and discoloration
- Professional repair of cracks or moisture issues
Professional polishing saves time and effort. It guarantees a clear finish and better driving safety.

Credit: www.carsales.com.au
Frequently Asked Questions
How Does Toothpaste Clean Car Headlights?
Toothpaste contains mild abrasives that remove dirt and grime from headlights. It polishes the surface, reducing haze and improving clarity. This DIY method is cheap and effective for restoring headlight brightness quickly.
Can Toothpaste Prevent Headlights From Yellowing?
Toothpaste temporarily removes yellowing but does not prevent it long-term. UV exposure causes recurring yellow haze. For lasting results, apply a UV-resistant sealant after polishing with toothpaste.
How Often Should You Polish Headlights With Toothpaste?
Polish headlights every 6 to 12 months using toothpaste. Frequent polishing can wear the plastic. Regular maintenance keeps headlights clear and improves nighttime visibility.
Is Toothpaste Safe For All Headlight Types?
Yes, toothpaste is generally safe for plastic and glass headlights. Use non-gel, non-whitening toothpaste for best results. Avoid abrasive or whitening formulas that may damage the surface.
Conclusion
Polishing car headlights with toothpaste is simple and cheap. It removes dirt and haze, making lights clear again. You only need toothpaste, a cloth, and some water. Spend a few minutes rubbing gently, and you will see the difference. Clear headlights improve your safety while driving at night.
Try this easy method before buying expensive products. It saves money and keeps your car looking good. Give it a shot and enjoy brighter, clearer headlights today.