
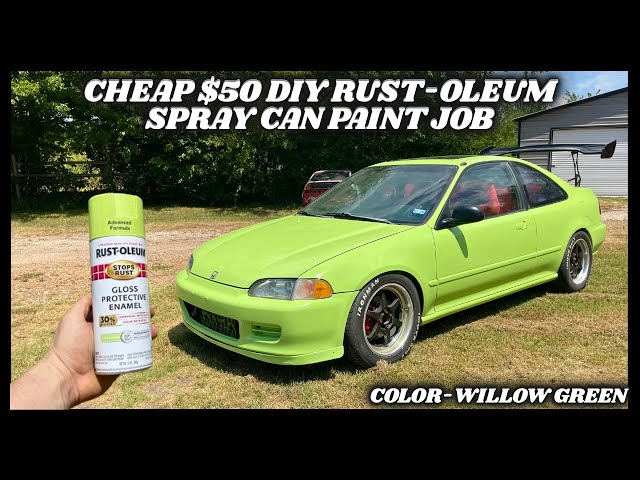
Are you looking to give your car a fresh, professional-looking paint job without spending a fortune? Painting your car with a spray can might sound tricky, but with the right steps, you can achieve impressive results right at home.
This guide will walk you through everything you need to know—from prepping your car to applying the paint smoothly. By the end, you’ll feel confident to transform your car’s look and save money doing it yourself. Ready to get started?
Let’s dive in!

Credit: www.youtube.com
Preparing Your Car
Preparing your car before painting with a spray can is crucial to achieve a professional finish. Skipping or rushing this stage can lead to uneven paint, peeling, or an overall amateur look. Taking the time to clean, sand, and mask your car properly sets the foundation for a smooth, long-lasting paint job.
Cleaning The Surface
Start by removing all dirt, grease, and grime from your car’s surface. Use a strong detergent or a dedicated car cleaner and a microfiber cloth to wipe down every inch. Even tiny dust particles can ruin your paint job, so pay attention to hard-to-reach spots.
Have you ever noticed paint bubbling or flaking off? This often happens because oils or contaminants weren’t fully cleaned off. Thorough cleaning helps the paint stick better and prevents future problems.
Sanding For Smoothness
Sanding is what gives your car’s surface a smooth, even texture for the paint to grip onto. Use fine-grit sandpaper—around 400 to 600 grit works well—and sand in circular motions. You don’t need to remove all the old paint, just roughen up the surface enough to help the new paint adhere.
Pay special attention to scratches, rust spots, or uneven areas. Sanding these down evens out imperfections and makes your final coat look flawless. Have you tried painting without sanding? The results can be patchy and uneven, so don’t skip this step.
Masking Areas To Protect
Masking off parts of your car that you don’t want to paint saves you from hours of cleanup later. Use painter’s tape and plastic sheets or newspaper to cover windows, trim, tires, and badges. Make sure the tape edges are firmly pressed down to prevent paint from bleeding underneath.
Think about how frustrating it would be to repaint your windows or trim because of overspray. Proper masking keeps your job neat and professional. Have you ever accidentally painted something you didn’t mean to? Masking is the best defense against that.
Choosing The Right Spray Paint
Choosing the right spray paint is a key step in painting your car. The paint you select affects the look and durability of your finish. Selecting the proper spray paint helps avoid issues like peeling or fading. This section guides you through picking the best paint for your project.
Selecting Paint Type
Pick a paint type that fits your car’s material and your skill level. Common types include enamel, lacquer, and acrylic. Enamel offers a hard, glossy finish and lasts long. Lacquer dries quickly but may require more coats. Acrylic is easy to use and cleans up with water. Consider how long you want the paint to last and how shiny you want the finish.
Matching Color Shades
Match the paint color to your car’s original shade for a seamless look. Use the car’s paint code, found on the door frame or manual. Compare spray cans’ colors under natural light before buying. Small color differences can be noticeable on large surfaces. Test a small area first to ensure the color matches well.
Gathering Necessary Supplies
Prepare all supplies before painting. Besides spray paint, you need:
- Primer to help paint stick
- Clear coat for protection
- Sandpaper for smoothing surfaces
- Masking tape and paper to cover areas
- Protective gloves and mask
Having the right tools makes painting easier and improves results.
Setting Up Your Workspace
Preparing the right workspace is key to a smooth spray painting job. A clean, organized area helps avoid dust and mistakes. It also keeps you safe and makes the paint dry evenly. This section covers three crucial points for setting up your workspace.
Finding A Well-ventilated Area
Choose a place with plenty of fresh air. Good ventilation removes harmful paint fumes. Open doors and windows or use fans to increase airflow. Avoid small, closed spaces. Paint smells can build up and cause health problems. A well-ventilated space helps the paint dry faster too.
Ensuring Proper Lighting
Bright light shows every detail clearly. Natural daylight is best for true color. If painting indoors, use strong white lights. Avoid shadows and dark spots. Good lighting helps spot imperfections early. It also guides smooth and even paint strokes.
Maintaining Ideal Temperature
Keep the workspace temperature between 60°F and 80°F (15°C – 27°C). Too cold slows paint drying and causes uneven coverage. Too hot makes the paint dry too fast, causing cracks. Avoid painting in humid or rainy conditions. Stable temperature ensures a clean, smooth finish.

Credit: www.youtube.com
Spray Painting Techniques
Spray painting a car with a spray can requires some basic techniques. These techniques help you get a smooth, even finish without drips or patches. Understanding how to handle the spray can and apply the paint is key to a professional look.
Each step, from shaking the can to applying the paint, affects the final result. Practice and patience make a big difference. Follow these spray painting techniques for better results.
Shaking The Can Properly
Shake the spray can well before use. Move it up and down for about one to two minutes. This mixes the paint and prevents clogs. Stop shaking only when the paint sounds well mixed inside.
Shake again briefly between coats to keep the paint smooth and even.
Maintaining Correct Distance
Hold the spray can 6 to 12 inches away from the surface. Too close causes runs and drips. Too far makes the paint dry before it sticks. Keep a steady distance for an even coat every time.
Applying Even Coats
Spray in thin, light layers rather than one thick coat. Thin coats dry faster and avoid drips. Wait 10 to 15 minutes between coats. This builds smooth color and good coverage.
Multiple thin coats give better results than one heavy coat.
Using Smooth Strokes
Spray with steady, side-to-side strokes. Start spraying just before the edge of the part. Stop after passing the other edge. Do not stop mid-stroke. This avoids patches and uneven spots.
Keep your hand moving at a steady pace for a smooth finish.
Drying And Curing
Allow the paint to dry fully between coats to avoid smudges or runs. Curing takes time, so keep the car in a dust-free area until the paint hardens. This ensures a smooth, lasting finish.
Drying and curing are key steps in painting a car. They ensure a smooth and durable finish. Proper drying prevents imperfections and enhances longevity. Here’s how to manage this crucial stage effectively.
Allowing Adequate Drying Time
Patience is vital during the drying process. Allow each coat to dry thoroughly. Follow the spray can instructions for drying times. Typically, this may take 20 to 30 minutes. Ensure the environment is warm and dry. A controlled space speeds up drying.
Avoiding Dust And Debris
Keep the workspace clean and dust-free. Dust can ruin the paint job. Use a tarp or drop cloth to cover surfaces. Close windows and doors to minimize air flow. Consider using air filters to catch floating particles.
Curing For Durability
Curing solidifies the paint, enhancing its strength. It usually takes a few days. Avoid washing or waxing the car during this time. This allows the paint to harden fully. A well-cured paint job resists chips and scratches.
Finishing Touches
Finishing touches make all the difference when painting a car with a spray can. This stage ensures your work looks professional and lasts longer. Paying attention now can save you from costly mistakes later.
Applying Clear Coat
The clear coat protects your paint and gives it a glossy finish. Hold the spray can about 6 to 8 inches from the surface to avoid drips. Apply 2 to 3 light, even layers, allowing each layer to dry for about 10 minutes before the next.
Be patient—rushing this step can cause bubbles or runs. Have you noticed how a fresh clear coat instantly makes colors pop? That’s the magic of this protective layer.
Polishing For Shine
Once the clear coat is fully dry, polishing adds that showroom shine. Use a fine polishing compound and a soft cloth or buffer. Work in small circular motions to even out the surface and remove any minor imperfections.
Don’t press too hard; let the polish do the work. You’ll be surprised how a little elbow grease transforms a flat finish into a brilliant gloss. What’s stopping you from turning your car into a mirror reflection?
Removing Masking Tape
Carefully peel off the masking tape after the paint and clear coat have dried. Pull the tape back slowly at a 45-degree angle to prevent lifting paint edges. If you spot any rough edges, gently sand and polish them out.
Leaving tape on too long can make removal harder and damage your paint job. Did you know timing here can impact your entire project’s success? Handle this step with care to keep your finish flawless.
Common Mistakes To Avoid
Painting your car with a spray can can be a rewarding DIY project, but it’s easy to make mistakes that affect the final look. Understanding common pitfalls helps you avoid frustration and wasted effort. Let’s dive into some frequent errors and how you can steer clear of them.
Over-spraying
Applying too much paint at once is a common trap. It causes runs, drips, and uneven coverage that ruins the smooth finish you want.
Spray in light, even coats instead. Hold the can about 6-12 inches from the surface and move steadily side to side. Think of it as layering thin sheets rather than dumping paint all at once.
Have you noticed paint pooling or dripping on your project? That’s a clear sign to slow down and spray less per pass.
Ignoring Surface Prep
Skipping sanding, cleaning, or priming leads to poor paint adhesion and flaky results. The paint won’t stick well to dirt, rust, or uneven surfaces.
Spend enough time prepping your car’s surface. Sand it smooth, wipe away dust and grease, and apply a primer if needed. This sets a solid foundation for your spray paint to bond properly.
Think about your last paint job—did you prep thoroughly? If not, you probably saw peeling or blotchy spots emerge fast.
Painting In Poor Conditions
Environmental factors like wind, humidity, and temperature play a huge role in the outcome. Painting in cold, hot, or windy weather can cause the paint to dry too quickly or unevenly.
Pick a calm, moderate day or a well-ventilated garage with stable temperature. Avoid painting under direct sunlight or when it’s very humid to prevent bubbling and texture problems.
Have you ever noticed your paint drying too fast or looking rough? The weather might be the culprit you overlooked.

Credit: m.youtube.com
Maintaining Your New Paint Job
Protect the new paint by washing your car gently and avoiding harsh chemicals. Park in shaded areas to prevent sun damage. Regular waxing keeps the paint shiny and lasting longer.
Maintaining your new spray-painted car finish is crucial to ensuring it looks fresh and vibrant for years. After investing time and effort into painting your car, you want that glossy sheen to last. Here are some essential tips to help you maintain your new paint job.
Washing Tips
Regular washing is key. Use a mild car shampoo and a soft sponge to clean your car. Avoid harsh chemicals or abrasive materials that could scratch the paint. It’s best to wash your car in the shade, as direct sunlight can cause water spots and soap residue to dry onto the paint. Dry your car with a microfiber towel to prevent streaks and water spots.
Protecting From Elements
Parking in a garage or under a carport shields your car from harmful UV rays and weather elements. If indoor parking isn’t an option, consider using a quality car cover. Waxing your car every few months adds an extra layer of protection. It not only enhances the shine but also guards against dirt and grime buildup. Think about investing in a paint sealant. This can provide a stronger barrier against environmental damage.
Touch-up Recommendations
Inevitably, small scratches and chips may occur. Address them promptly to prevent rust and further damage. Keep a small bottle of your car’s paint color on hand for touch-ups. You can use a fine brush or a toothpick for precise application on small spots. Consider using a clear coat pen to seal and protect the touch-up area. This ensures a seamless blend with the rest of your paint job. Taking these steps not only preserves your car’s appearance but also enhances its longevity. What strategies will you adopt to maintain your new paint job?
Frequently Asked Questions
How Do I Prepare A Car For Spray Can Painting?
Clean the surface thoroughly and sand it to remove old paint and rust. Mask off areas you don’t want painted to avoid overspray.
What Spray Can Paint Is Best For Cars?
Use automotive spray paint designed for cars. Choose high-quality, rust-resistant cans with a clear coat for durability and a smooth finish.
How Far Should I Hold The Spray Can From The Car?
Hold the spray can about 6 to 12 inches from the surface. This distance ensures even paint coverage and prevents drips.
How Many Coats Of Spray Paint Should I Apply?
Apply 2 to 3 light coats. Allow each coat to dry before applying the next to achieve a smooth, even finish.
Conclusion
Painting your car with a spray can takes patience and care. Follow each step slowly and do not rush. Use light, even coats for the best finish. Keep your workspace clean and well-ventilated. Practice on a small area before starting the whole car.
This simple method can save time and money. With some effort, your car will look fresh and new. Remember, good results come from careful work and attention. Try it yourself and enjoy the process.